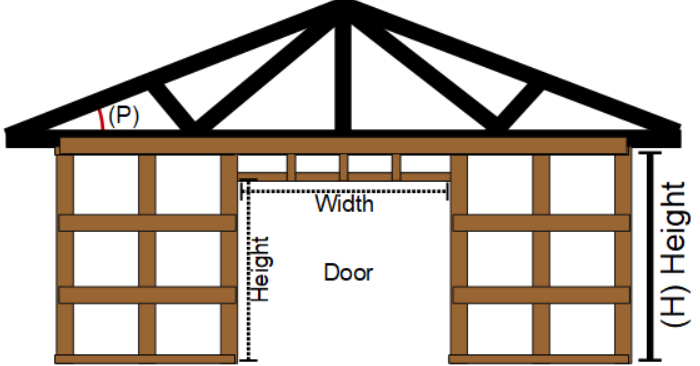
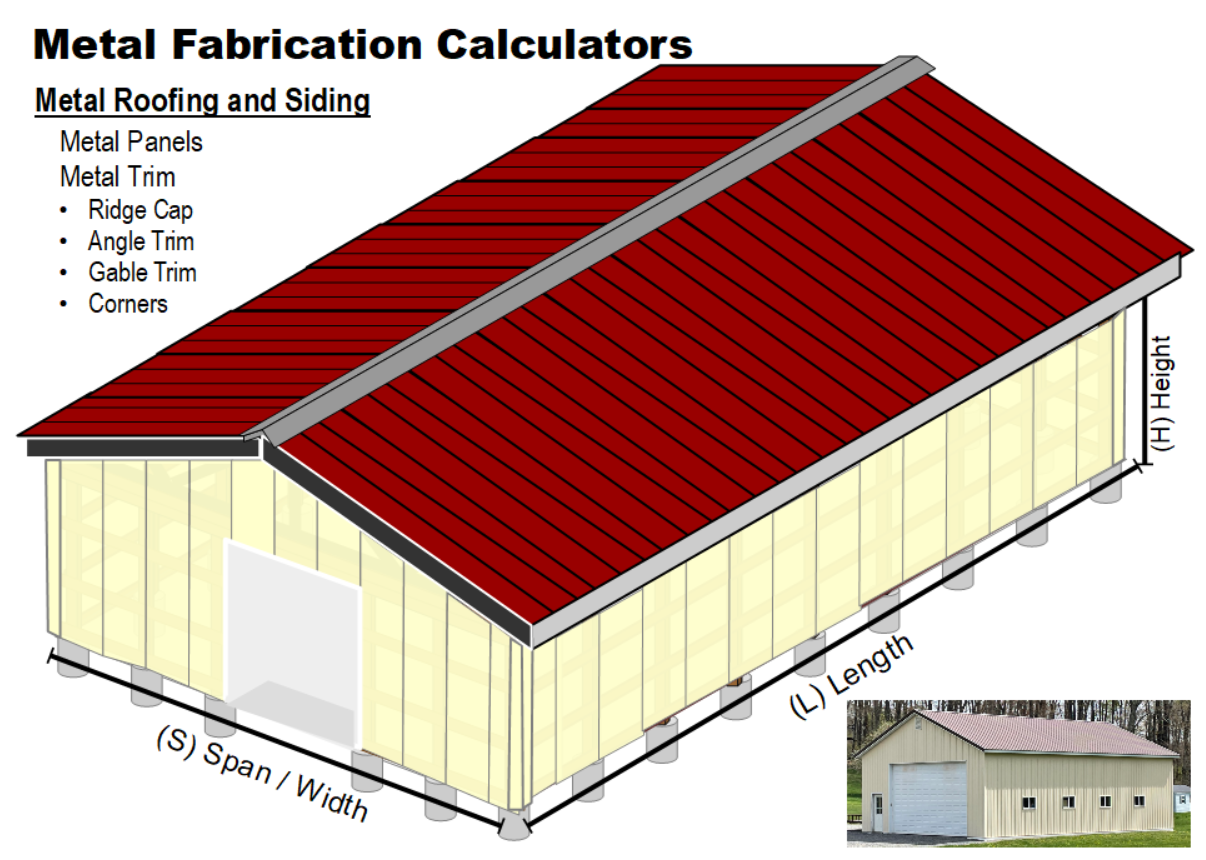
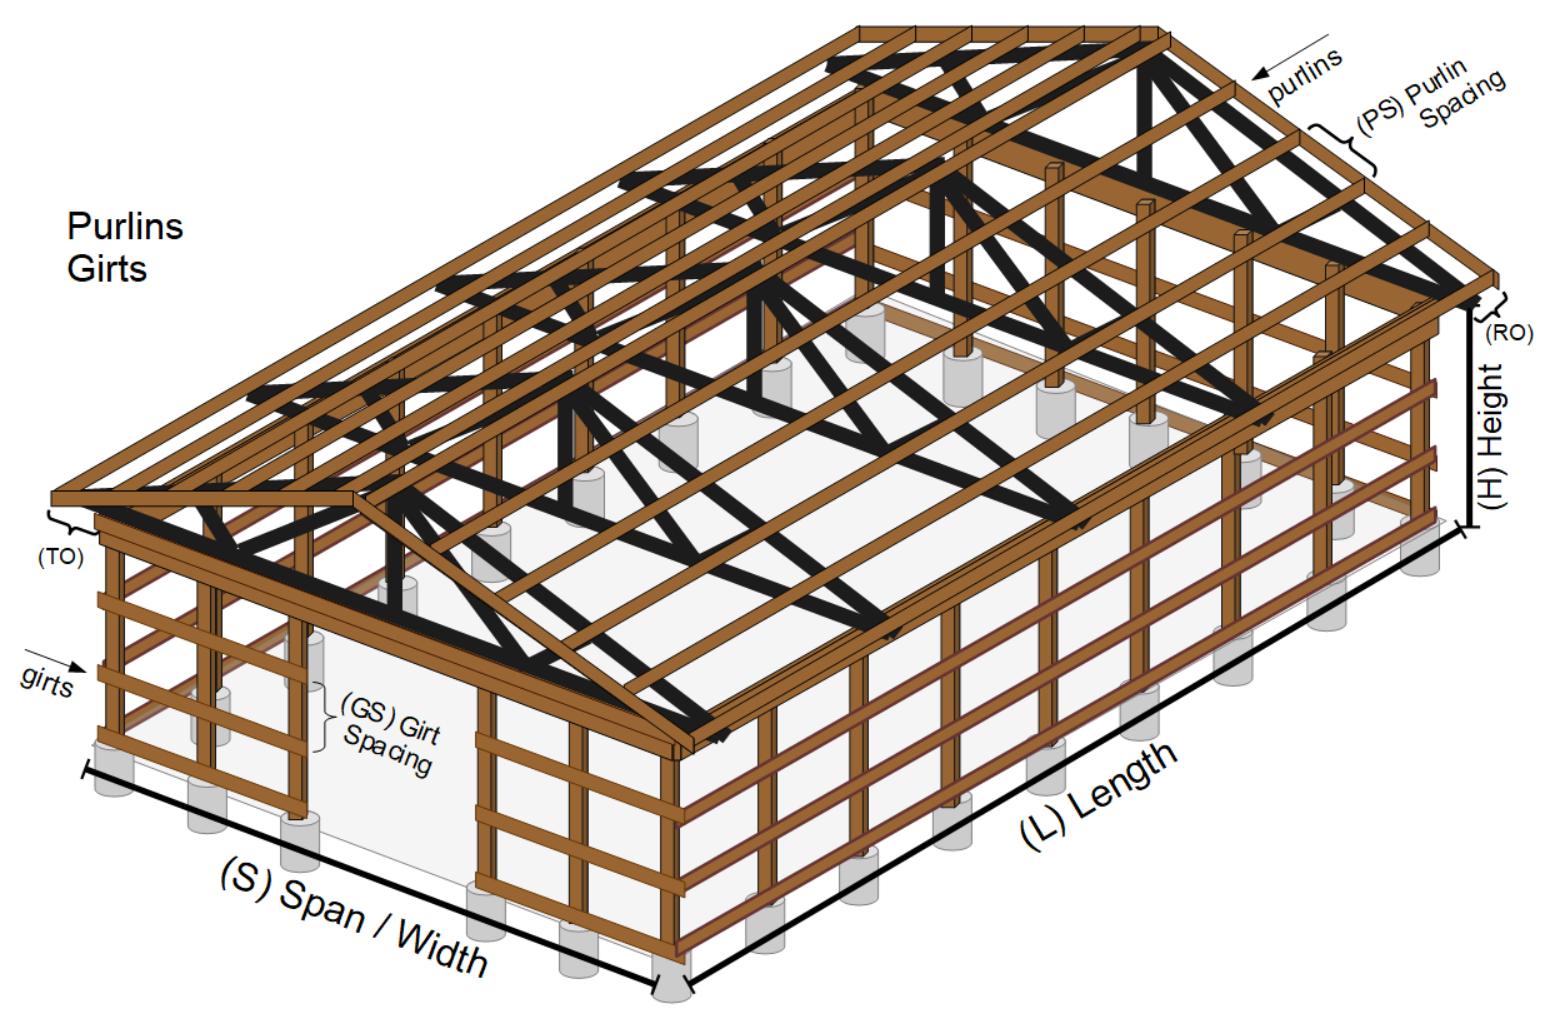
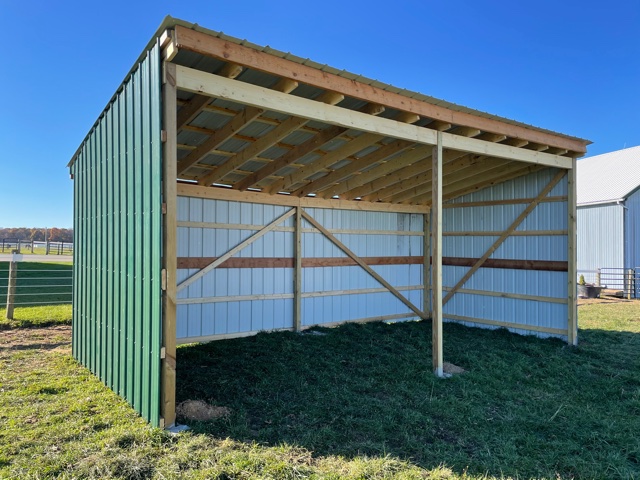
The Pole Barn Materials calculator computes the top to bottom framing, siding and roofing materials needed for a pole barn (see picture) based on a few dimension. 
INSTRUCTIONS: Choose units and enter the following:
- (L) Length of Building
- (W) Width of Building
- (H) Inside Height
- (P) Pitch of Roof
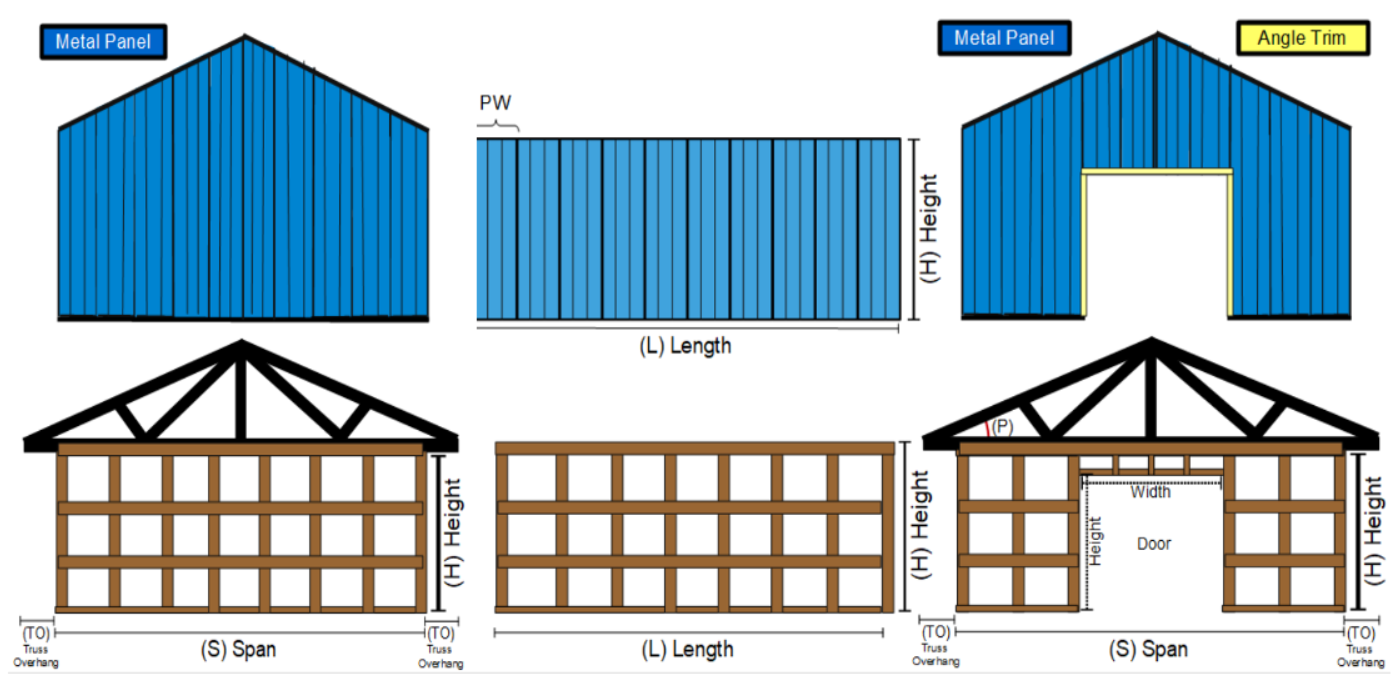
- (DW) Door Width (large centered door - e.g., 9x8, 10x10 or 12x12 are common)
- (DH) Door Height (large centered door)
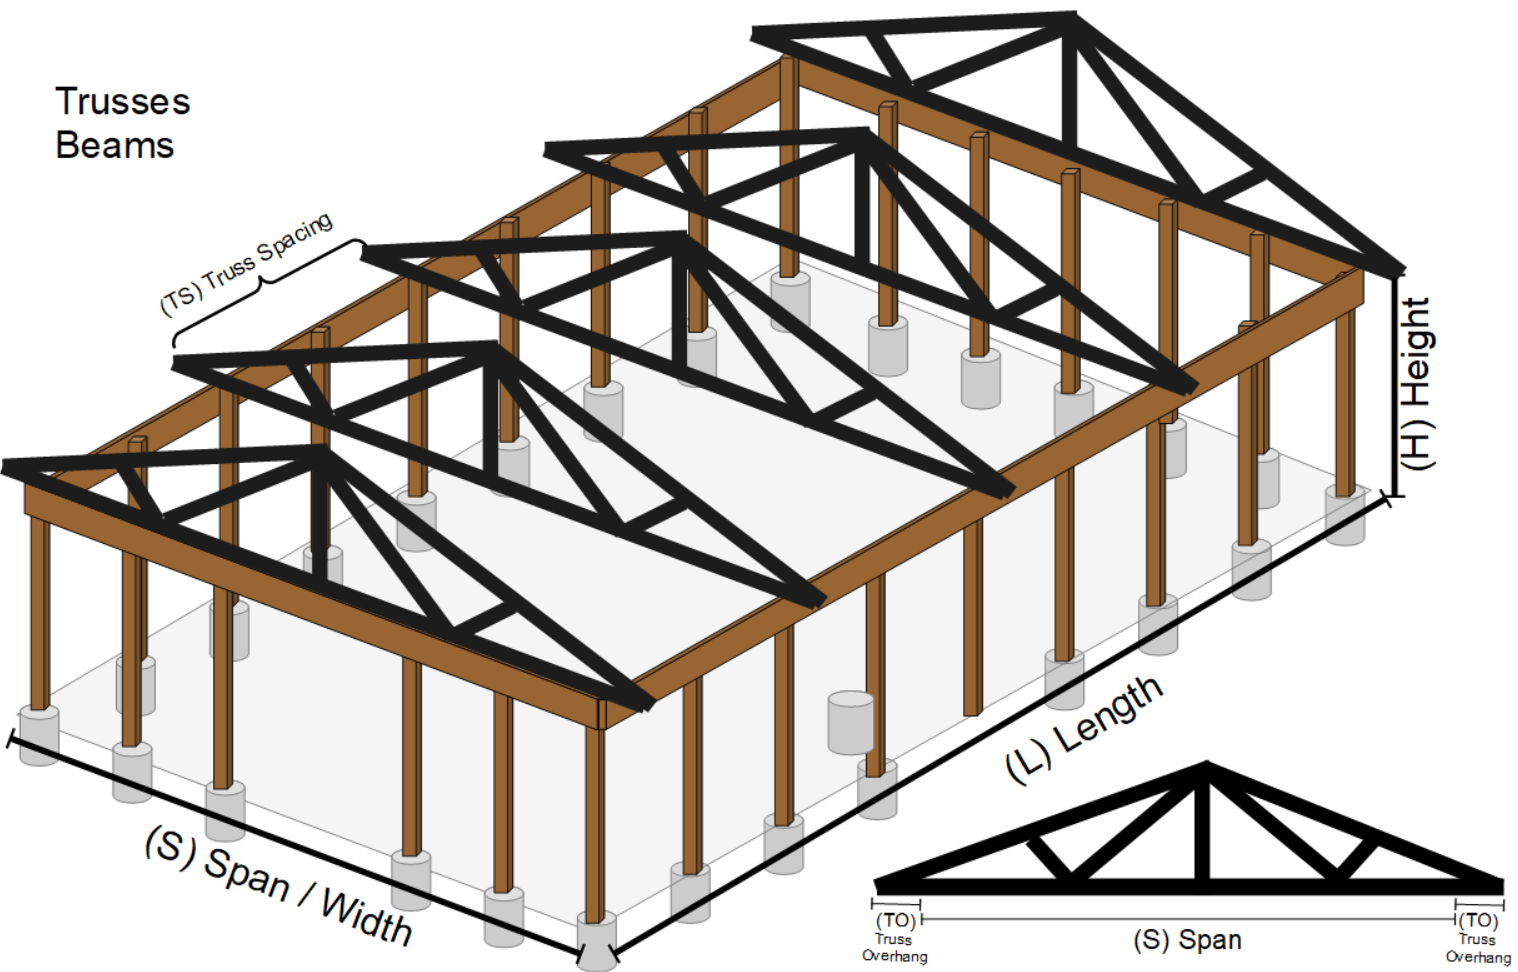
- (TS) Truss Spacing
- (PS) Purlin Spacing (horizontal roof boards)
- (GS) Girt Spacing (horizontal side boards)
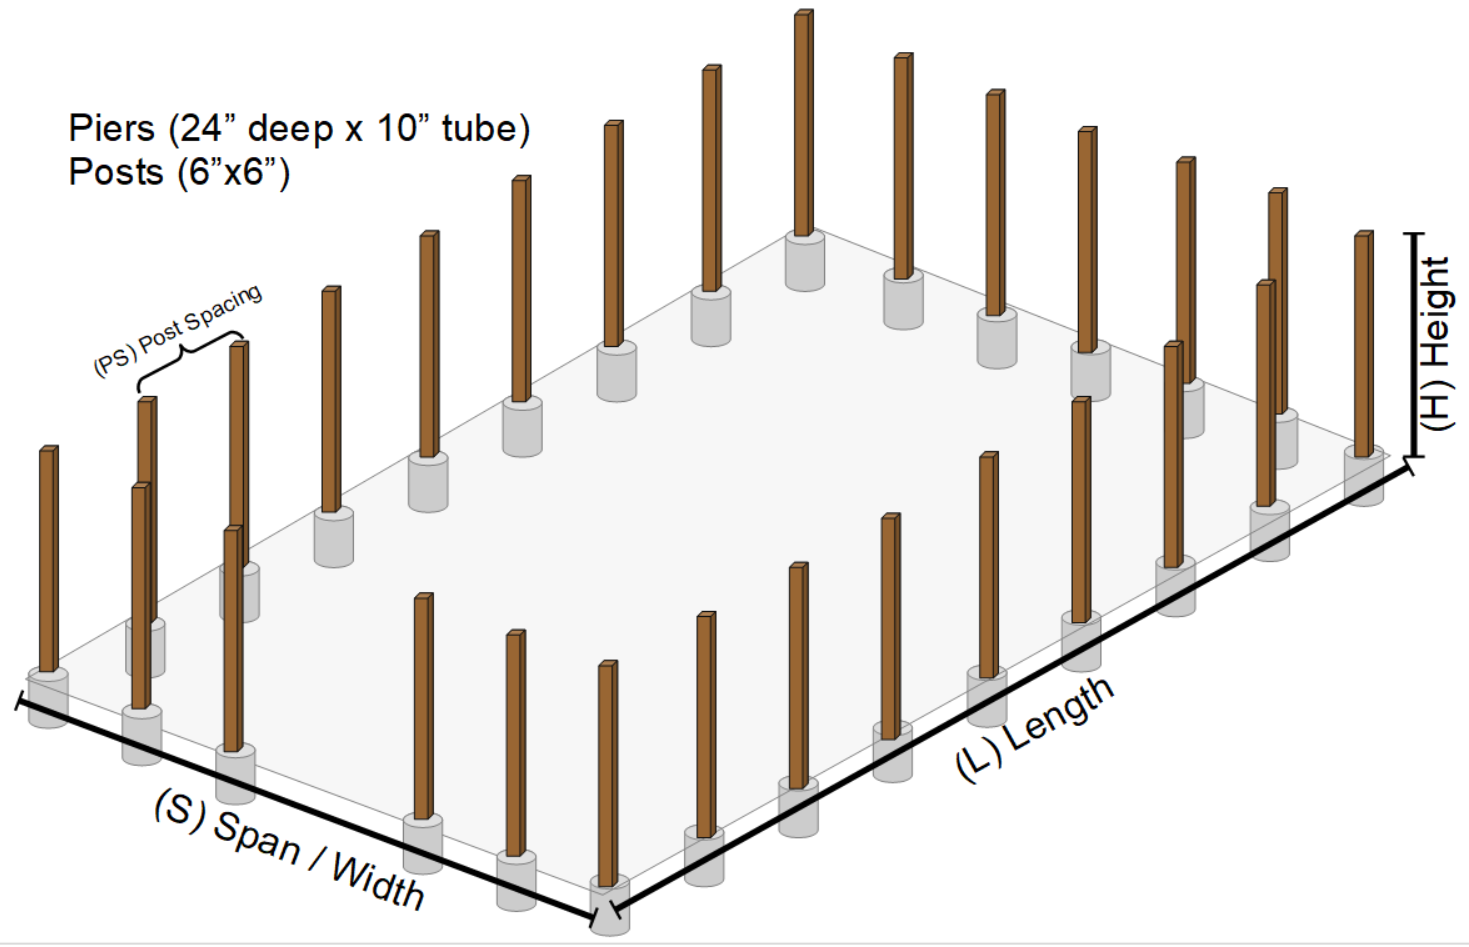
- (PST) Post Spacing (distance between the verticle posts and the center of the concrete piers)
- (MD) Measurement Details (YES / NO)
Pole Barn Materials: The calculator returns the following list of materials:
- Metal Roof
- Ridge Cap Length
- Total Length of Gable Trim
- Length of Metal Roof Panels
- Number of Metal Roof Panels
- Number of Screws for Roof Panels
- Length of Snow Guard
- Length of Angle Trim
- Number of Trusses
- Length of Purlin Rows
- Number of Purlins Rows
- Total Roof Area
- Metal Siding:
- Number and Panel Lengths on gable side with Door
- Length of Angle Trim for Doorway
- Number and Panel Lengths on gable side w/o Door
- Number and Panel Lengths on sides
- Cut Angle for Gable
- Number of Screws
- Length of Girt Rows
- Number of Girt Rows
- Number of Posts
- Total number of metal screws (sum of the above)
- Total linear feet of metal panels (sum of the above)
- Volume of Concrete for Slab in cubic yards
- Volume of Concrete for Peers in cubic yards
The Pole Barn Calculator contains functions to compute the construction materials for a pole barn with concrete piers, wood framing, roof trusses for a normal gabled roof and metal panels and trim for the roof and sides.
This calculator has following defaults:
- (PoC) 30" Purlin Spacing
- (PW) 36" Metal Panel Width
- (PS) 5' 6x6 Post Spacing
- (TS) 10' Truss Spacing
- (GS) 36" Girt Spacing
- (CD) 4" Concrete Slab Depth
- (PV) 2'6" x 1' concrete peers (0.0727 cubic yards) every 10 feet, every other post.
Construction Steps
The steps to construct your building are as follows:
- Prepare the site with all needed grading. Level areas are by far the easiest to use. Consider this in your site location choices.
- Set the corners. Make sure that you have a square building by double checking the that the length of the diagonals are the same.
- Set the location of the piers which include the corner piers and dig the holes.
- Pour the piers. Put some crushed stone at the bottom of your pier holes and add a few inches of concrete (e.g., 3"). Then use a concrete forming tube to pour your piers. It is wise to use a laser level to mark the height of the tubes for concrete. This will ensure that the top of the piers are all level. This will save a tremendous amount of work later.
- Before the piers are set, place the post anchors in the concrete.
- Erect the posts. Some do this with girts holding together the posts for an entire wall, but the weight will demand the help of equipment (e.g., forklift)
- If the girts are not already on the posts, add them
- Make sure the posts are plumb (vertical) and secured with diagonal boards.
- Place the beams at the top of the posts.
- Place trusses on beams. Make sure that trusses are secure and plumb using diagonal boards.
- Install roof rakes on gable ends.
- Fix the purlins to the top of the trusses and rakes. Some use the purlins to frame the rakes.
- Put metal trim on gable ends and truss facia.
- Put metal panels on the roof.
- Put metal trim around the door
- Put metal panels on the side walls
Site Preparation
The building site should be leveled and the location of the corners set. Then, one can calculate the location and spacing of the piers.
Trusses and Beams
Once the posts are in place, the beams and then trusses can be put in place.
Purlins and Girts
The next step is to apply the girts on the sides of the building and the purlins on the roof.

Metal Roof and Trim
The purlins provide the right material for applying your metal roof and trim with metal screws.
Metal Siding and Trim
The girts are the right understructure for metal siding.

Inside
Once the framing is completed and the metal installed on the roof and walls, the door(s) can be hung and the interior finished.
Special Thanks
The following experts were consulted in the construction of these calculators. However, they assume no liability and advise all developers to confirm all their construction estimates against professional calculations and to confirm that all of their calculations conform to local building laws, codes and regulations.
Pole Barn Calculator
The Pole Barn Calculator contains functions to compute the construction materials for a pole barn with concrete piers, a slab, wood framing, roof trusses for a normal gabled roof and metal panels and trim for the roof and siding.
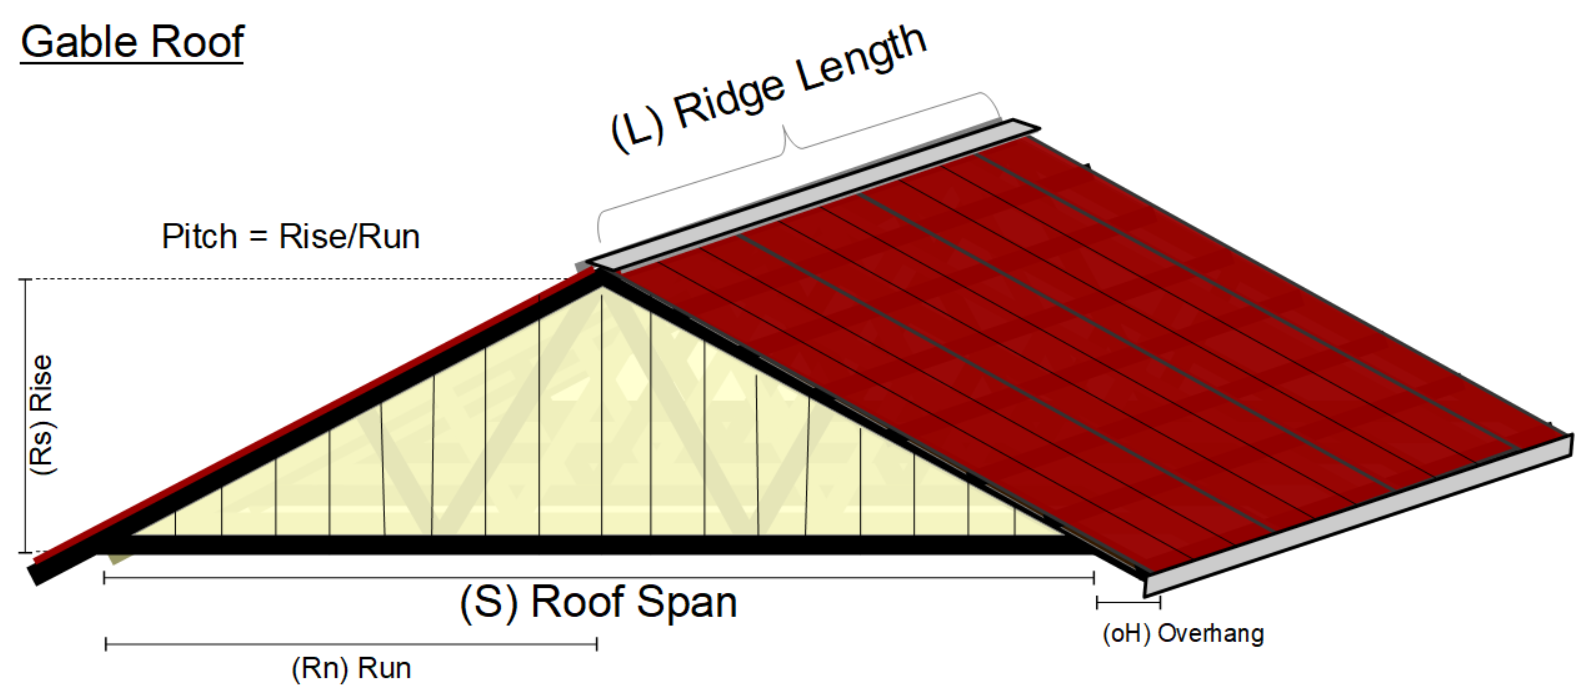
- Gable Roof Metal: This estimates the materials needed for a metal roof for a simple gabled roof based on the roof dimensions.
- Purlins for a Roof: This computes the total number and length of purlins for a simple gable roof based on the ridge length of the roof, the roof pitch and the span of the roof.
- Trusses Needed for Roof: This computes the number of trusses needed for a roof based on the ridge length and spacing.
- Metal Siding for Gable Ends: This computes the metal siding materials (vertical panels) for a wall under a gable roof end based on the dimensions.
- Metal Siding for Gable End with Door: This computes the metal siding materials for a wall under a gable roof end based on the dimensions.
- Girts for a Building: This computes the number of rows of girts and their lengths for a building.
- Wall Beams for a Building: This computes the lengths beams for the outer wall of a building.
- Posts for a Building: This computes the number of vertical posts for a building based on dimensions and spacing.
- Rebar and Concrete in a Slab: This computes the total length and weight of rebar and the volume of concrete needed for a slab.
- Piers for a Building: This computes the number of piers for a building and the amount of concrete needed.
- Pole Barn Materials: This computes the top to bottom framing and roofing materials needed for a pole barn (see picture) based on a few dimension.
- Pole Barn Metal Roof and Siding Cost: This uses an estimated the linear feet of metal panels needed for a pole barn with a door way, and provides an estimated cost for the metal panels for the roof and siding based on a the dimension and cost per linear foot of panels.
- Corrugated Metal Paint or Coating Volume: This estimates the volume of paint or other coating (e.g., spray insulation) is needed for a corrugated surface.
IMPORTANT NOTE: Confirm all calculations with authoritative sources such as architectural drawings before risking health or wealth on the results of any calculator, and ALWAYS adhere to government approved building codes.
 Metal Roof and Siding Calculator
Functions for roofing and siding using metal panels and trim to compute the number of metal panels, trim and screws for various shaped roofs and walls based on the dimensions of the building.
- Metal for Gable Roof: This estimates the materials needed for a simple gabled metal roof based on the roof dimensions.
- Metal Siding for Gable End Wall: This estimates the vertical metal siding panels for a wall under a gable end based on the dimensions.
- Metal Siding for Gable End Wall with Door: This estimates the metal siding materials for a wall under a gable end with a door based on the dimensions.
- Metal Siding for Wall: This estimates the metal siding materials for a rectangular wall based on the dimensions.
- Metal for Dormer Roof: This estimates the metal panel and trim materials for one or more roof dormers based on dimensions.
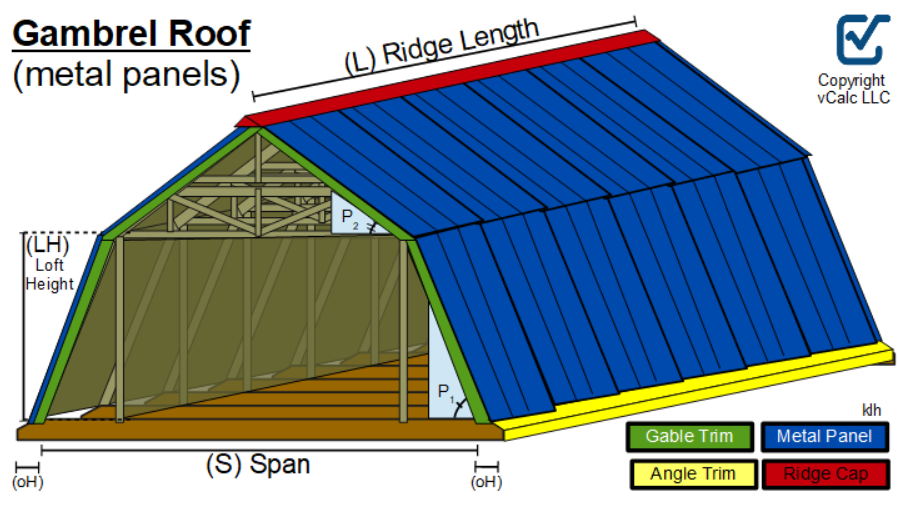
- Metal for Gambrel Roof: This estimate the length and number of metal panels needed for a gambrel roof based on dimensions.
- Metal Panels for Gambrel Wall: This computes the number of vertical siding panels, their lengths and the total length of vertical panels on a wall under a gambrel roof. It also includes the total square feet and the number of metal screws needed at 0.75 screws per square foot.
- Metal for Hip Roof: This estimates the metal roof materials for a hip roof based on dimensions.
- Metal for a Pyramid Roof: This estimates the metal roof materials for a pyramid hip roof based on dimensions
- Metal for a Shed Roof: This estimates the total number of metal panels and lengths of trim needed to cover a single sloped roof based on dimensions..
- Metal for Shed (Roof and Walls): This estimates the total number and length of metal panels for the roof and walls based on the ridge length of the roof, the front and back heights, the width of the shed roof building and the front and back overhangs. See simple ag run-in below.
- Pole Barn Materials
 : This uses an estimated the linear feet of metal panels needed for a pole barn with a door way, and provides an estimated cost for the metal panels for the roof and siding based on a the dimension and cost per linear foot of panels.
 - Pole Barn Metal Roof and Siding Cost: This uses an estimated the linear feet of metal panels needed for a pole barn with a door way, and provides an estimated cost for the metal panels for the roof and siding based on a the dimension and cost per linear foot of panels.
- Screws for Metal Gable Roof: This estimates the number of metal panel screws needed for a gable roof based on roof dimensions.>
- Screws for Metal Siding on a Gable End: This computes the number of metal panel screws needed for metal siding for a wall under a gable roof end based on the dimensions.
- Screws for Metal Siding on a Gable End with Door: This computes the number of metal panel screws needed for metal siding on a wall under a gable roof with a doorway based on the dimensions.
- Screws for Gambrel Metal Roof:
 This computes the number of screws to attach metal panels needed for a gambrel roof based on the dimensions.
 - Screws for Metal Siding Wall: This computes the number of metal panel screws for metal siding on a rectangular wall based on the dimensions.
- Corrugated Metal Paint or Coating Volume: This estimates the volume of paint or other coating (e.g., spray insulation) is needed for a corrugated surface.
 Materials for roofs
 , walls and dormers include panels (number and length), panel cut angle, the number of required metal panel screws, lengths of ridge cap, gable trim, angle trim, snow guard, purlins (number and length), surface area and ridge and valley lengths where appropriate.
Ag Panel Pricing
There are several price points for metal roofing and siding, but the common Agriculture Panel (Ag Panel) is widely used and often the most economical. Ag Panel metal has reached the point where it is less expensive as a roofing material than common asphalt shingle. For this reason, Ag Panel pricing is provided from a survey for convenience.
The C-Lok, Ag Panel, G-Rib price survey includes the following for the most recent pricing surveyed: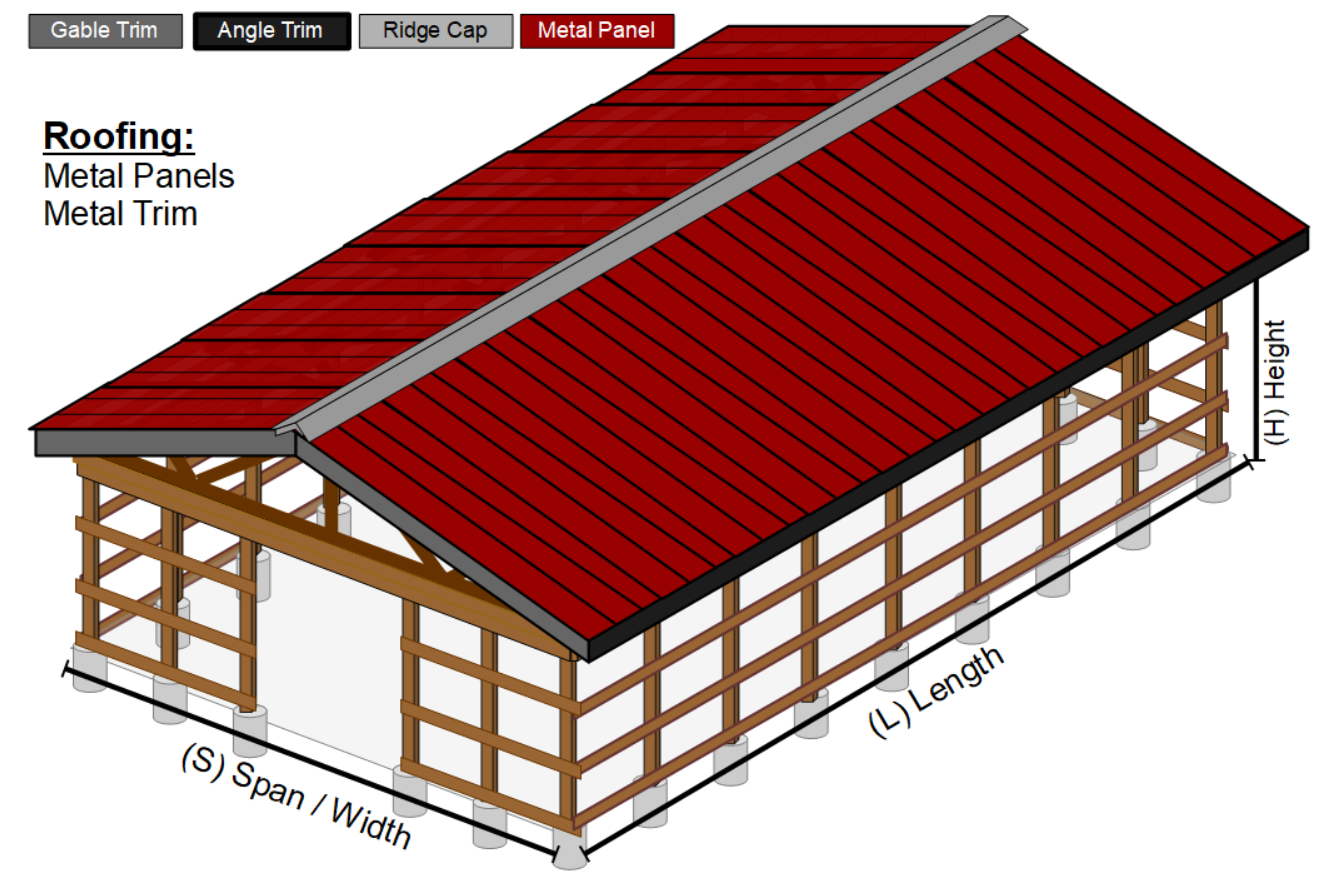
- Date Survey: 8/28/25
- Source of Pricing Source: CN Metals
- Cost per Unit:
- [$2.78 USD/ft] - Panel (36" wide) - dollars per linear foot
- [$0.09 USD/screw] - Screws (with seal gasket) - dollars per screw
- [$1.9 USD/ft] - Ridge Cap - dollars per linear foot
- [$1.9 USD/ft] - Outside Corner (trim) - dollars per linear foot
- [$0.95 USD/ft] - Snow Rail - dollars per linear foot
- [$2.93 USD/ft] - Drip Edge - dollars per linear foot
- [$0.22 USD/ft²] - Fanfold Insulation - dollars per square foot
NOTICE: Before risking health or wealth on calculator results, confirm calculator estimates with a professional sources and ALWAYS ADHERE to LOCAL BUILDING CODES.